Cheddar Cheese Corn Bread

Cheddar Cheese Corn Bread

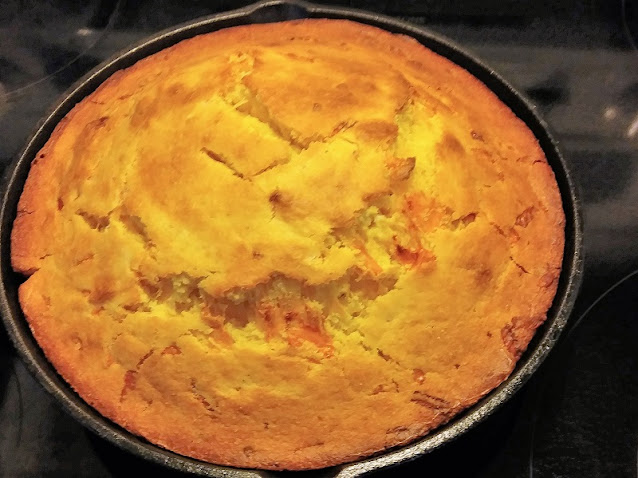
The weather cooled off a little yesterday, so I thought it was okay to use the oven. What a perfect time to try out my cheddar cheese cornbread recipe.

I think cornbread goes well with just about any meal or if you're like me I like it just as a snack with plenty of butter of course.

I wanted to make this savory so I added sharp cheddar cheese. I also wanted to try something different and bake this in my cast iron skillet.

Cast iron skillet cornbread recipe
Cast Iron Skillet Cornbread:

As always I used my KitchenAid Stand Mixer to prepare the batter. You will find all of the ingredients below.

I preheated the oven to 400 degrees and placed my 8-inch cast-iron skillet in the oven while I made the batter.

When the batter was ready I took the skillet out of the oven and buttered the inside with 1 tablespoon of butter. Then I poured the batter into the skillet.

I placed the skillet back in the oven and baked the cornbread for 30 minutes.


Homemade cornbread cast iron skillet

Now, I need to explain the mistake that I made. I used my 8-inch cast-iron skillet. The cornbread should have been baked for 20 to 25 minutes.

This was too much batter for the 8-inch skillet causing me to bake it for 30 minutes to get the center of the cornbread cooked.

Not that it wasn't delicious because all of it is gone already. I just think the edges cooked a little too much.

So, if you're going to try this cast iron skillet cornbread I recommend using a 10-inch skillet. I know that I will the next time.

Using a 10-skillet the bake time should be 20 to 25 minutes.


Here are the ingredients for cheddar cheese cornbread: 

1-1/4 cups all-purpose flour
3/4 cup yellow cornmeal (I used Quaker)
1/4 cup sugar
2 teaspoons baking powder
1/2 teaspoon salt
1 cup milk
1/4 cup vegetable oil
1 tablespoon honey
1 egg (beaten)
1 cup sharp cheddar cheese
1 tablespoon butter (For the skillet)

Mix all dry ingredients together, then add oil, milk, honey, and egg. Mix until it forms a batter then add the cup of cheddar cheese and continue until it is well mixed.

As always thanks for stopping by and I hope you enjoy.


Easy Grilled Shrimp Recipe

Easy Grilled Shrimp Recipe
Easy Grilled Shrimp:

The weather here in Western New York finally took a turn for the good. We've had some beautiful weather the last couple of days with temperatures in the high 60's.

For us, that means it's time to get the grill fired up. We had a bag of shrimp in the freezer and Fran thought it would be better to grill it instead of cooking it in the house.

Cooking shrimp on the grill is really not difficult at all. We had the whole meal ready in about 15 minutes.

After Fran thawed and rinsed the shrimp she skewered it for the grill.


We used our flat stainless steel skewers but you can also use the wood or bamboo skewers. If you use the wood or bamboo just make sure that you soak them in water for about 10 minutes so they don't burn. We had a little less than a pound of shrimp and yielded a full three skewers or about 21 shrimp.

Now that the shrimp was ready I fired up one side of the grill and set it to the high setting. Then I melted 2 tablespoons of butter and brushed it on both sides of the shrimp. I seasoned both sides generously with Old Bay Seasoning and Garlic Powder.

Buy Old Bay Seasoning if you've never tried it before. There are so many recipes for Old Bay seasoning and it adds such a wonderful flavor to so many things.

Here is everything I used for this easy grilled shrimp:

1 lb. of shrimp (Fresh would be the best)
2 tablespoons butter melted
Old Bay Seasoning
Garlic Powder

I grilled the shrimp on the high setting on my grill for 3 minutes per side and served the shrimp over brown rice. This was a quick, easy, and tasty meal ready in under 20 minutes.

As always thanks for stopping by and I hope you enjoy.


Mozzarella Stuffed Chicken Parmesan

Italian chicken Parmesan dish

This Italian chicken parmesan dish is a perfect family pleaser, and easy to make. I can't take credit for making this one. This stuffed chicken parmesan recipe is a creation of my son Sammy.

Sammy is an excellent cook, and he should be, as he has a culinary degree. He is always making some amazing and delicious creations. His stuffed chicken parmesan is no exception to amazing and delicious, made with all fresh ingredients, mozzarella, basil, and prosciutto.

The ingredients and instructions for this delicious dish are below:


Italian chicken Parmesan recipe

First Sammy cut the chicken breasts in half lengthwise.

He set up a breading station using beaten eggs, flour, and breadcrumbs and fried them on both sides.

I would have used my Cast Iron Skillet for this.


Italian chicken Parmesan

 He spread some sauce in the bottom of a baking pan. Then he placed one-half of each chicken breast in the pan and layered it with prosciutto, mozzarella, and basil.

You can use your favorite sauce in a jar or try my Quick Marinara sauce here.


breaded chicken Parmesan recipe

Sammy then placed the second half of the chicken breast on top.

Again he layered the fresh mozzarella and basil on top, bake this according to the instructions below.


Italian Chicken Parmesan Recipe:


INGREDIENTS:

3 large chicken breast
1c. flour
4 eggs, beaten
1 log of fresh mozzarella
1/2c. of fresh basil
1 jar favorite tomato sauce
4 slices fresh prosciutto
1 to 2c. oil
  
DIRECTIONS:

-Preheat oven to 425 degrees
-Cut each chicken breast in half
-Cover chicken with saran wrap on a cutting board
-Tenderize the chicken breast with a meat tenderizer, set aside
-Set up a breading station with the flour, beaten eggs, and breadcrumbs
-Dredge chicken breast in flour, then eggs, and finally breadcrumbs
-Heat oil in a large frying pan; make sure there is enough to cover the bottom of the pan
-Once the oil is hot place chicken in oil and brown on each side, probably 2 min. per side
-Remove chicken from frying pan to a plate or sheet tray covered in paper towels to drain oil
-Grease a baking dish with Pam or Crisco
-Cover the bottom of the baking dish with a thin layer of the tomato sauce
-Thin slice the fresh mozzarella
-Chop fresh basil
-Layer 3 pieces of chicken breast on the bottom of the pan
-Top chicken with sliced prosciutto, then sliced mozzarella, then half the basil
-Place other chicken breasts on top, then place a few slices of mozzarella
-Spoon some of the tomato sauce on top with the remainder of the basil
-Place in preheated oven and cook for 30 minutes

NOTES:

-Check the chicken after 20 minutes for doneness.  Adjust time and temperature accordingly

-Serve with a side of your favorite pasta.

Sammy lives two hours away from us so I didn't get to taste his creation but just looking at the pictures makes my mouth water.

For more from my son Sammy, you can check out his Facebook page: Cooking with Monaco 


As always thanks for stopping by and I hope you enjoy


Handy Kitchen Tools for this Recipe


Easter Rice Pie

Easter Rice Pie

Easter Rice Pie

This traditional Italian Easter rice pie is one that my mother made every year. I finally found the recipe and just had to make it this year.

There are several different versions of this recipe. I think the most popular is made with ricotta cheese and I will be making that one also.

This rice pie recipe is made with pineapple and raisins and is a delicious dessert any time of the year. So you don't have to wait for Easter every year to make this.

 Here is what I used for this Italian Rice Pie Recipe:

2 cups cooked and cooled white rice (1/2 cup uncooked = 2 cups cooked)
1/2 cup butter or margarine
1-1/4 cup sugar
1/2 Tsp. lemon extract
7 large eggs
1-20oz. can crushed pineapple
1/2 cup raisins
1 tsp grated orange rind

This is how I made my Easter Rice Pie:


recipe Italian rice pie
I started by boiling my rice for about 15 minutes. Then remove it from the heat add the butter and cover the pot.

While the rice was cooling down I added the eggs, sugar, lemon extract, and orange rind in my KitchenAid mixer and beat these together using the whisk attachment.

Then I added the cooled rice, crushed pineapple (juice and all), and raisins into my mixture.


I stirred everything together with a spoon to make sure all of my ingredients were well-mixed. I greased a 9-inch x 13-inch glass baking dish with butter and poured my mixture in.

The oven was already preheated to 350 degrees, I baked my Italian rice pie on the center rack for one hour.

Italian Easter Rice Pie

This is my rice pie right out of the oven. I let this cool completely and then put it in the refrigerator for about an hour before cutting it.

You can also cook this in 9-inch pie plates. I'd say that you may need two or three of them. Your cooking time may be a little less if you use pie plates.


As always thanks for stopping by and I hope you enjoy!

These are the kitchen tools I used to make this delicious dessert

Here is your shopping list for this delicious dessert. Have it all delivered right to your door.

Best Pan Seared Scallops

Best pan seared scallops

Pan Seared Scallop Recipe:

We love all kinds of seafood and scallops are no exception. Since it was Friday during Lent I thought it was a great idea to make some easy pan seared scallops.

I served these over brown rice with a butter and lemon sauce. Oh! and of course, I used garlic I always like to use garlic when I cook.

What I used to make pan seared scallops:

1-lb. fresh wild sea scallops (25-30)
1/2 cup butter (divided)
1 clove garlic finely chopped
4 tablespoons fresh chives chopped (divided)
1/2 of a lemon and grated rind
Salt and Pepper

easy pan seared scallops
Preparing the scallops:

I used fresh sea scallops not frozen. I rinsed the scallops with cold water and laid them out on some paper towels.

Then I patted them dry the scallops must be completely dry or they won't brown and caramelize.

I seasoned both sides with salt and pepper, and then prepared my skillet.


pan seared scallops recipe

Preparing my Cast Iron Skillet:

I set the skillet on medium heat and added 2-1/4 tablespoons of butter.

Then added the garlic and about 1 tablespoon of the freshly chopped chives.

Then I grated some fresh lemon rind right into the pan while everything was heating up.


cook pan seared scallops

Cooking the scallops:

Now I turned the heat up to the high setting and began cooking the scallops.

I didn't want to crowd the scallops in the pan so I only cooked 9 or 10 at a time.

I seared the scallops for exactly 2 minutes per side until both sides were nice and brown.


While I was searing the scallops I had the brown rice boiling. After the rice was finished and the scallops were seared I made my lemon butter sauce.

I added the remaining butter, grated more lemon rind, and one more tablespoon of the fresh chopped chives into the hot skillet.

Then I squeezed the juice of 1/2 of a fresh lemon into the pan and stirred this around for about 15 seconds then removed the pan from the heat.

I placed the scallops over a bed of the brown rice poured some lemon butter sauce over the top and then garnished with fresh chopped chives. This turned out to be just a perfect meal for us on a Friday night. Serve this with a nice glass of your favorite white wine.

As always thanks for stopping by and I hope you enjoy!

Kitchen tools I used to make these perfect pan seared scallops

“ I earn money from purchases on affiliate links at no additionl cost to you.” Disclosure Statement

X