Instant Pot Country Ribs and Sauerkraut

Instant Pot Country Ribs and Sauerkraut

Eating pork and sauerkraut on New Years Day is well known to be good luck for the New Year. I'm not sure that this always works but who are we to break such a well-known tradition. So, we always have our pork and sauerkraut on New Years Day.

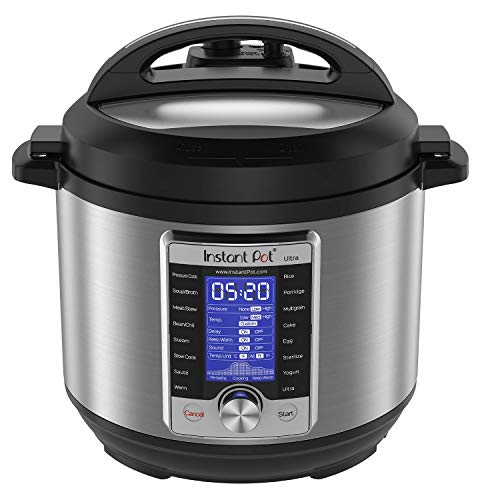
Since Santa brought Fran an Instant Pot for Christmas this year we thought what a great way to make our pork and sauerkraut.

So far we've only made a couple of things in the Instant Pot. Fran made meatballs and tomato sauce the other day in about 30 minutes and it was delicious.

And, this is coming from somebody who likes their tomato sauce cooking for hours. I didn't document the sauce process but, when we make it again I'll post it.

Instant Pot Country Ribs

The first thing was to brown the ribs on all sides. To do this, I let the Instant Pot heat, up and then added 2 tablespoons of peanut oil. I added some black pepper and browned the ribs on all sides.

Instant Pot country Ribs and Sauerkraut:

Here is what I used:

1-1/2 lbs boneless Country Ribs
2 tablespoons peanut oil or Olive Oil (For Browning)
2 lbs. sauerkraut (drained)
2 heaping tablespoons brown sugar
1/3 cup water

Instructions:
  1. First I warmed up the Instant Pot by pressing the saute' button.
  2. Added the oil, black pepper and browned the ribs on all sides.
  3. I added the sauerkraut, brown sugar and water.
  4. Lock the lid in place and make sure the vent is closed.
  5. Pressed the manual button, then set the time on 20 minutes.
  6. After 20 minutes I moved the vent to open to relieve the pressure.
  7. Then pressed the keep warm button for about 5 minutes before opening.
That's all there was to it. In about 30 minutes we were enjoying delicious Country ribs and sauerkraut. 

I highly recommend the Instant Pot for quick and easy meals. I can see why they say this is a real time saver.

Spinach Cream Cheese Appetizer

Spinach Cream Cheese Appetizer

These spinach cream cheese roll-ups make a perfect appetizer for any party or just as a great snack. This recipe is sort of a different way to serve up spinach dip.

You and your family are going to love this no-cook easy-to-make recipe. And, these will disappear just as fast as you made them.

With the football playoffs coming up these are a perfect crowd-pleaser for your guests on game day. And, for all of those bacon lovers out there, add some bacon bits for some added flavor.

Spinach Cream Cheese Appetizer: Ingredients 

1-8 ounce package of cream cheese (Softened)
3/4 cup mayonnaise
1/2 cup grated Romano or Parmesan cheese
1 clove garlic (minced) or 1/2 teaspoon garlic powder
1 teaspoon lemon juice
1-12 ounce jar of roasted red peppers (drained and diced)
1-10 ounce package of frozen chopped spinach (Thawed and drained)
5 or 6 (10-inch flour tortillas
1 small package of bacon bits (Optional)

Instructions:
  1. In a large bowl, mix cream cheese, mayonnaise, lemon juice, grated cheese, and garlic.
  2. Add in the spinach, roasted red peppers, and bacon bits,  
  3. Mix well with a hand mixer or KitchenAid Stand Mixer.
  4. Spread the mixture evenly on the flour tortillas.
  5. Roll them up tightly and wrap them in plastic wrap.
  6. Place them in the refrigerator for about 2 hours,
  7. Cut them into 1/2-inch slices and enjoy. 
As always thanks for stopping by and I hope you enjoy it!

KitchenAid Artisan Series 5-Qt. Stand Mixer with Pouring Shield - Imperial BlackKitchenAid Artisan Series 5-Qt. Stand Mixer with Pouring Shield - Imperial BlackKitchenAid Artisan Series 5-Qt. Stand Mixer with Pouring Shield - Imperial BlackKitchenAid NEW 7 Quart Bowl Lift Stand Mixer with Double Flex Edge Beater KSM70SK, Empire RedKitchenAid NEW 7 Quart Bowl Lift Stand Mixer with Double Flex Edge Beater KSM70SK, Empire RedKitchenAid NEW 7 Quart Bowl Lift Stand Mixer with Double Flex Edge Beater KSM70SK, Empire Red


Olive Oil Walnut Garlic Spaghetti

Olive Oil Walnut Garlic Spaghetti

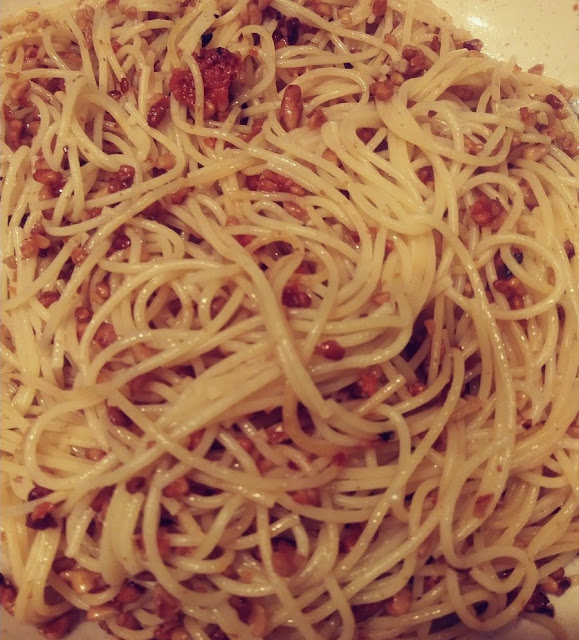
What a fantastic combination of flavors for this favorite meatless pasta dish. Olive oil, walnuts, garlic, and your favorite pasta.

For our family, this is a traditional dish for our meatless Christmas Eve dinner. But, you don't have to wait a whole year to enjoy this flavor-filled pasta dish. This makes a perfect quick and easy meal for any meatless day on your menu.

Walnut Olive oil pasta sauce


This one is so quick and easy you could have it on the table in 30 minutes or less. So, it's perfect if you worked all day and want a meatless meal.

In a 12-inch pan Saute' the olive oil, garlic, and walnuts over medium to low heat. Saute' until the walnuts are toasted and browned.

Start and cook your favorite pasta. We always use spaghetti.

When the pasta is cooked to your liking, drain it and add it to the Saute' pan. Toss together until all is mixed well.


Add your Romano or Parmesan cheese and enjoy. There are some options to add if you like them. I'll mark the options in the ingredients.

Ingredients:

1/4 cup olive oil
3 cloves garlic (minced)
1 cup chopped walnuts
1 lb. Spaghetti or your favorite pasta
1/2 teaspoon red pepper flakes (Optional)
1 teaspoon lemon zest (Optional)
Garnish with Freshly chopped parsley (Optional)
Salt and pepper to taste
Romano or Parmesan Cheese 

Instructions:
  1. In a large pan add the olive oil and heat over low heat.
  2. Add the garlic, and chopped walnuts. This would be the time to add the pepper flakes and lemon zest if you choose.
  3. Saute' until the walnuts are toasted careful not to burn.
  4. Add the cooked pasta to the saute' pan and toss. 
  5. Garnish with parsley if you like and serve.
As always thanks for stopping by and I hope you enjoy.


How to Oven Roast Chestnuts

How to Oven Roast Chestnuts

Chestnuts are one of my favorite seasonal snacks, especially during the Holidays. Chestnuts are in season from about September to January making these little beauties very popular during the Holiday season.

No, you don't really need an open fire to roast chestnuts. Oven roasting chestnuts is really a very simple process.

Choosing the right chestnut is also easy. Look for the larger shinney chestnuts and heavier by weight. These will be what I call the meatiest.

How to Oven Roast Chestnuts:

  1. Using a sharp knife carve an X in the rounded side of the chestnut. (I wear a glove so I don't cut a finger off)
  2. Place them in a bowl or pan and fill with water. Soak them for 30 to 60 minutes.
  3. Preheat the oven to 400 degrees.
  4. Place the chestnuts on a cookie sheet cut side up. I used my 10-inch cast iron skillet to roast these.
  5. Bake the chestnuts for 20 to 25 minutes. You'll see the cuts peel back.
  6. Remove and cover for about 5 to 10 minutes. Then peel the hard shell and the tough brown skin off and enjoy your chestnuts.
Enjoy your chestnuts with a nice glass of red or white wine. Serve as an appetizer or snack at your next party.

As always thanks for stopping by and I hope you enjoy!


Pecan Cup Cookies

Pecan Cup Cookies

There is no way it's Christmas without these pecan cup cookies on the cookie tray. Growing up I really don't remember a Holiday without pecan cups.

Whenever someone in the family was getting married, my grandmother, mother, and aunts would all be busy making cookies. And, these pecan cups were always one them.

These are really easy to make and oh! so good. You don't have to wait for the Holidays to make these little treats. These are perfect any time of the year and are great with a cup of coffee or tea.

Easy pecan cups


This is Jamie pressing the dough into the mini muffin tin with our handy Norpro Tart Tamper.  This tool is so handy for pastries and tarts. Notice Jamie's festive "Christmas Story" shirt.

Pecan cup recipe

The mini muffin tin is filled and the pecan cups are ready for the oven.

Ingredients for the dough:

3 ounces Cream Cheese (Softened)
1/2 cup butter
1 cup all-purpose flour

Ingredients for the filling:

1 egg, beaten
1 tablespoon butter
1 teaspoon vanilla extract
3/4 cup packed brown sugar
2/3 cup chopped pecans

Instructions:
  1. Blend the cream cheese and butter until smooth.
  2. Add flour and mix until dough forms
  3. Wrap and refrigerate to chill. (About 30 minutes)
While the dough is chilling let's make the filling. Then we'll get them ready for the oven.
  1. Mix brown sugar and butter.
  2. Add the egg and vanilla, mix until blended.
  3. Now stir in the pecans.
  4. Form the dough into 1-inch balls and press into your mini muffin to form a cup.
  5. If you are using the tamper have some flour handy it prevents the tamper from sticking to the dough.
  6. Fill the cups evenly with the filling.
  7. Bake on center rack at 350 degrees for 30 minutes.
This recipe yielded about 18 pecan cups. We always double the recipe 18 is not enough for me.

No Bake Chocolate Rum Balls

No Bake Chocolate Rum Balls

These no-bake chocolate rum balls are for sure a crowd pleaser. For the last several years I haven't made these for the Holidays. But, this year we pulled out the recipe for these little treats.

These are no-bake and oh! so easy to make. I had these finished in about 30 minutes. The rum flavor really comes through after a day or so in the refrigerator.

Rum Ball Recipe


This recipe calls for Vanilla Wafers ground pecans or walnuts, baking cocoa, and powdered sugar.

I mixed all of the dry ingredients in a medium-sized bowl and then added the liquid ingredients.

No hand mixer or stand mixer needed here. Just work everything together with a large fork or wooden spoon.

Following you'll find all of the ingredients and directions to make these little beauties.


Ingredients:

1 cup ground pecan or walnuts (I used pecans)
2-1/2 cups Vanilla Wafers (Almost a whole box)
1 cup powdered sugar
3 tablespoons baking cocoa
1/4 cup rum (I used just a little more)
3 tablespoons honey
2 tablespoons water

Instructions:
  1. Add all dry ingredients into a medium-sized mixing bowl.
  2. Add rum, honey, and water and mix until all combined.
  3. Roll into 1-inch balls and then roll in more powdered sugar.
  4. Refrigerate in an airtight container.
I yielded about 30 of these chocolate rum balls minus the ones that I ate along the way.

As always thanks for stopping by and I hope you enjoy!


Easy Monster Cookie Recipe

Easy Monster Cookie Recipe

Cookie week continues at our house with this easy monster cookie recipe. here is another favorite festive cookie Jamie makes every year.

These cookies are made with oatmeal and peanut butter and there is no flour added. These cookies will be gluten-free only if you use gluten-free oatmeal.

Jamie makes these festive by using red and green M&Ms. These cookies are a treat any time of the year and oh! so easy to make.

Making Monster Cookies

Tyler is helping by rolling the mixture into large balls and placing them on the cookie sheet lined with parchment paper.

Easy monster cookie mix

On the cookie sheet and ready for the oven. Tyler used about 2-heaping tablespoons each to roll these out.

Easy Monster Cookie Recipe:

Ingredients:

1 stick butter (8 tablespoons softened)
1-1/2 cups peanut butter creamy or crunchy
3 large eggs
1-1/4 cups light brown sugar
1 cup white sugar
1/2 teaspoon salt
2 teaspoons baking soda
1 teaspoon vanilla extract
4-1/2 cups old-fashioned oats or quick oats 
1 cup M&Ms
1- 11.5oz. chocolate chips

Instructions:

  1. In a large bowl add eggs, brown sugar, and white sugar.  Mix well, using a hand or stand mixer.
  2. Add baking soda, vanilla, salt, peanut butter, and butter. Mix until you have a creamy mixture.
  3. Now add oatmeal, M&Ms, and chocolate chips. Stir until combined you'll have a sticky dough.
  4. Use heaping tablespoons to form balls and place them 2 inches apart on a parchment-lined cookie sheet.
  5. Bake at 350 degrees on the center rack for 8-10 minutes.
  6. Let the cookies cool on the cookie sheet for a couple of minutes. the move them to a rack to cool.

Festive Monster Cookies


These monster cookies are cooling right out of the oven. The recipe yielded about 3 to 4 dozen cookies depending on how large you make them.

As always thanks for stopping by and I hope you enjoy!

OXO Good Grips Medium Cookie Scoop,Black/SilverOXO Good Grips Medium Cookie Scoop,Black/SilverOXO Good Grips Medium Cookie Scoop,Black/SilverBaking Sheet Set, 2-Piece Large Cookie Sheet Set with Silicone Handles, Steel Baking Pan, Baking Sheets for Oven, BPA Free Cookie Sheets for Baking Nonstick Set, Premium Sheet Pan, Black Baking TrayBaking Sheet Set, 2-Piece Large Cookie Sheet Set with Silicone Handles, Steel Baking Pan, Baking Sheets for Oven, BPA Free Cookie Sheets for Baking Nonstick Set, Premium Sheet Pan, Black Baking TrayBaking Sheet Set, 2-Piece Large Cookie Sheet Set with Silicone Handles, Steel Baking Pan, Baking Sheets for Oven, BPA Free Cookie Sheets for Baking Nonstick Set, Premium Sheet Pan, Black Baking Tray


Easy Snickerdoodle Cookies

Easy Snickerdoodle Cookies

This is cookie week in our house. We spend most for the week making all of our Christmas cookies. Jamie makes these amazing cinnamon-sugar cookies every year for the Holidays.

But, you don't have to wait for the Holiday's to make these crispy chewy easy snickerdoodle cookies. These cookies are a hit any time of the year. I just love the aroma that fills the house when these are in the oven.

Snickerdoodles are very similar to sugar cookies. What sets them apart is the cream of tartar in the recipe. And, these are so easy to make.

Snickerdoodles

Roll the dough into 1-inch balls. Then toss them in a mixture of cinnamon and sugar. Place them on your cookie sheet lined with parchment paper about 2-inches apart and bake.

Snickerdoodle Cookies

Let cool for a couple of minutes on the cookie sheet. Then Jamie places them on the table to cool. And, you'll find me right behind her eating them as the cool.

Easy Snickerdoodle Cookies:

Ingredients:

1/2 cup Crisco
1/2 cup butter, softened
1-1/2 cup white sugar
2 eggs
3 cups flour
2 teaspoons cream of tartar
2 teaspoons vanilla extract
1 teaspoon baking soda
1/4 teaspoon salt
1/4 cup white sugar (To toss 1-inch balls in)
1 tablespoon ground cinnamon (To toss 1-inch balls in)

Instructions: 
  1. Mix together the 1-1/2 cups sugar, the eggs, butter, Crisco, and the vanilla. 
  2. Add the flour, cream of tartar, salt, and baking soda.
  3. Mix until a ball of dough forms.
  4. Mix the 1/4 cup of white sugar and cinnamon in a shallow bowl.
  5. Form 1-inch balls or a little bigger if you like and roll in the sugar-cinnamon mix.
  6. Place on the cookie sheet about 2-inches apart.
  7. Bake at 400 degrees on the center rack for 10 minutes. 
We yielded about 48 wonderful snickerdoodles from this recipe, minus the ones that I ate as they were cooling off.

    Cake Mix Pumpkin Squares

    Cake Mix Pumpkin Squares

    These cake mix pumpkin squares are another one of our Holiday favorites. You really don't have to wait for a Holiday to make this bite-size dessert.

    Fran makes these a few times a year mostly for Thanksgiving and Christmas. This year I wanted to post and share the pumpkin squares dessert with you. So, I made them under Fran's direction using the recipe that she has been using for years.

    I have to tell you, these are so easy to make and so delicious. Bobby just can't get enough of them when we make them.

    Cake Mix Pumpkin Squares are made in 3 easy steps

    Step 1: Make the Bottom Layer

    Pumpkin squares cake mix recipe

    Step 2: Make the filling

    Pumpkin squares using cake mix

     Step 3: Make the Topping


    Pumpkin square recipes

    Bottom Layer Ingredients:

    1 Box Lemon Cake mix (Remove 1-1/2 cups for topping)
    1 stick melted butter (I used salted but you can use unsalted)
    1 egg beaten

    In a medium mixing bowl, mix together using a fork. Then press and spread into a 9-inch x 13-inch greased glass baking dish. Bake the bottom layer for 10 minutes at 350 degrees, then let cool.

    Ingredients for the Filing:

    1 can pumpkin (29oz.)
    3 eggs
    1/2 cup brown sugar
    1/4 cup white sugar
    2/3 cup milk
    3 tablespoons cinnamon

    I mixed all of this together using our hand mixer. Then spread this over the top of the cooled bottom layer.

    Ingredients for the Topping:

    1-1/2 cup Lemon cake mix
    1/2 cup white sugar
    3 tablespoons melted butter
    1/2 cup chopped nuts (optional) I didn't use chopped nuts

    Mix together with a fork until it is crumbly. Then spread the topping over the pumpkin filling. Bake this at 350 degrees for 50 to 55 minutes or until a knife comes out of the center clean.

    Pumpkin squares dessert


    Here are your cake mix pumpkin squares right out of the oven. Set this on a rack and let cool completely before placing in the refrigerator.

    We cut these into 1-1/2 inch across the 9-inch width and 2-inches by the length of the baking dish, yielding 36 pumpkin squares.

    As always thanks for stopping by and I hope you enjoy


    “ I earn money from purchases on affiliate links at no additionl cost to you.” Disclosure Statement