Making homemade Italian Sausage is really not that difficult. We haven't made our own homemade sausage for a long time. Sammy thought it was time to make some of our own again.
So, we set a weekend date and got to work. The best part of making your own Italian sausage is that you can season it to your personal taste.
The first thing that I did was check our local grocery stores for the best prices on pork butt. Luckily, one of our local stores had it on sale for $.99 a pound.

I ordered 20 pounds of coarse-ground pork butt and asked the butcher for enough casings to stuff the sausage. If you grind the meat yourself, cut it into about 1 or 2-inch pieces and coarse-grind it. It is very important to keep the meat cold, so work with small portions.
Making Homemade Italian Sausage: Our Spices

We use some very simple spices for our homemade sausage. Garlic powder, coarse ground black pepper, fennel seed, crushed red pepper, Paprika, and missing from the picture salt. The amounts we use for 20 pounds are below.

Next, we added our spices and mixed the pork. After thoroughly mixing, we set it in the refrigerator to keep the meat cold. I recommend mixing the pork in smaller batches, maybe 5 pounds at a time. Mixing 20 pounds at a time is just the way we've always made it.

After about an hour in the refrigerator, we started stuffing our links. We fried some to taste-test our mixture. This is a great idea because you may want to add more spices. We found ours to be just the way we like it.
Making Homemade Italian Sausage: Stuffing the Links

We rubbed a little olive oil onto the stuffer, threaded one casing over it, and then tied off the end. We used our KitchenAid Stand Mixer with the grinder and stuffer attachment to stuff our casings.
We worked with 5 pounds of meat at a time, keeping the rest in the refrigerator. Again, it is very important to keep the meat cold while working.
As Sammy loaded the hopper, I made the links giving them a twist about every 6 or 7 inches. We find that at this size, four links equal one pound.
The first casing yielded 5.5 pounds. Some people like to cut the casings into a shorter length. It's up to you and is a personal preference.

Bobby stopped over and gave me a little break. This is his first time making sausage, and I have to say he is a natural. He took right over and didn't skip a beat.
If you get any air bubbles while stuffing, just prick them with a needle to let the air out.
Making Homemade Italian Sausage: The Recipe
Spices for 20 pounds of Sausage:
1/3 cup salt
1/4 cup coarse black pepper
1/4 cup Fennel Seed
1/4 cup paprika
1/2 cup crushed red pepper (optional)
1/3 cup garlic powder
Breaking this down to 5 pounds:
4 teaspoons salt
1 tablespoon black pepper
1 tablespoon fennel seed
1 tablespoon paprika
2 tablespoons crushed red pepper (optional)
1 tablespoon garlic powder
I marked the red pepper as optional if you don't like hot sausage. We also
made some sausage patties, which are perfect for breakfast or a quick sandwich.
It turned out to be a fun day making homemade sausage with my son and
grandson.
As always, thanks for stopping by, and I hope you enjoy.
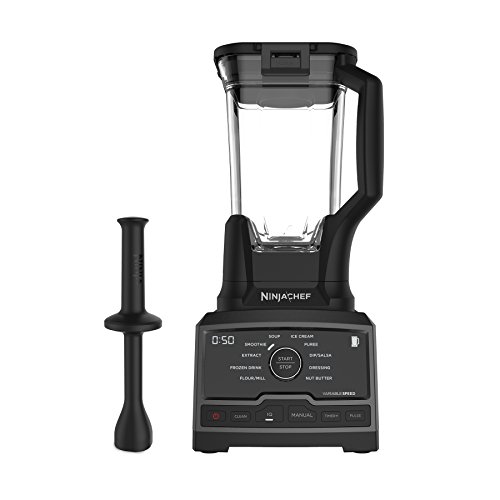
My KitchenAid is, without a doubt, my best kitchen tool. When making more than 5 pounds of sausage, I found the KitchenAid a bit slow. I'm
going to invest in one of these to make the next 20 pounds.